A big advantage of a container is that we can run applications of any kind on a platform and on any kind of hardware. Applications can be run easily on different cloud providers as well, from AWS, Azure, and Digital Ocean to Google Cloud. The issue arises when we have hundreds of containers which are spread across various servers. This causes a big problem to administrators/DevOps. If you are a big company which has a large number of engineers who maintain thousands of containers then the problem is not so big because you have a large number of people who will keep track of the state of those containers. However, if you have only one person in charge of all of that, then the problem is much bigger. Swarm was created as a solution to this problem. SwarmKit was published in 2016 and it is a set of libraries which enable a large number of new functionalities.
Swarm is in charge of managing a group of containers better known as cluster management. It consists of more hosts which use Docker which is run in swarm mode.
After installing Docker, swarm mode is not turned on. You have to execute an additional command to enable swarm. This is done in to influence the current Docker system or the tools which were supported by Docker. After starting swarm mode we get new commands, like:
- docker swarm
- docker node
- docker service
- docker stack
- docker secret
There are two types of nodes in the Swarm:
- Manager node
- Worker node
The relation between the two of them is presented in the scheme below:
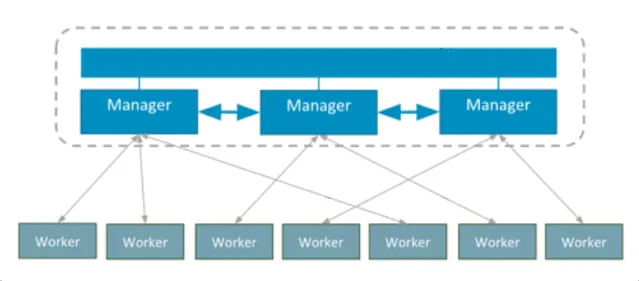
The relation between Manager node & Worker node
As we can see in the scheme, managers share a local database, known as Raft. Configuration and all the information needed for manager nodes is stored there. All the managers have a copy of the Raft database. All the data is encrypted during the process of data exchange. All of these nodes can be virtual machines or a dedicated server.
Raft
Raft is actually an algorithm which is based on consensus, that is on making decisions by common consent. Consensus is a fundamental problem in fault-tolerant distributed systems. The consensus includes more servers which need to agree on certain values. Once the decision is made, that decision is final. A typical example of consensus algorithm can work only if most of the servers are still available. For example, If we have a cluster of five servers, it can continue working even if two of them stop working. If more than two of them stop working, the whole cluster will stop progressing.
The types of nodes
Node is a docker instance which is involved in Swarm. One or many nodes can be run on one host. Generally, nodes should be placed on as many dedicated servers in production as possible. Manager node is responsible for running Swarm. Managers have three tasks:
- To maintain a cluster state
- To plan the running of services
- To serve HTTP API endpoint for Swarm
By using Raft, managers manage to maintain a consistent state of the entire Swarm as well as all the services which are run inside of it. We can have only one manager for testing, but for the production it is necessary to have more of them just in case that particular manager stops working. In this way other managers can take over the whole work. Managers can do the work as workers. Managers are actually workers which are given permission to control Swarm. We can turn managers into workers, but workers can also be promoted to managers.
By now we should have been able to create one container with ‘docker run’ command. We were not given a possibility to scale up, so we needed new commands which would enable this, which did happen after we activated Swarm mode. In Swarm, ‘docker service run’ command is replicated from a manager to every worker and it enables additional functionalities like, for instance, how many replicas of one container we want to have. This command is also known as an assignment. One service can have more assignments and each of the assignments can be created and can run a new container. The manager will decide on what node it will create the containers. It is expected that the manager will distribute the containers evenly.
Swarm does not only run containers when we tell it to do so, it is not that simple. Swarm has many layers which a command to run containers should go through before a container is created on worker node.

Architecture of manager and worker nodes
The manager and worker nodes constantly communicate. While workers check if there are new assignments for them, managers check which worker nodes are active and ready to accept more assignments and check the assignments that operate in accordance with what they have been told to do at that moment.
The architecture of a manager node
Manager nodes consist of 5 main parts, and these are:
- API
- Orchestrator
- Allocator
- Scheduler
- Dispatcher
API is in charge of accepting commands from the client, which, in this case, is terminal.
Orchestrator is used for evaluation of a cluster. It compares the state which the user determined with the state the cluster is currently in. If a user wants to add one more instance of any container, the orchestrator will compare a desired state of a cluster which is to have one instance in action with the current state. For example, there is not a single instance in action orchestrator will reply that one instance of a desired container should be created. This means that it will create a new assignment which needs to be completed. At this moment, the assignment is not yet given to any node.
Allocator is in charge of providing resources to a new assignment. It will take a command which the user entered through API, like, for example, creating a new service and a new task which orchestrator created, and it will allocate IP address for them.
Scheduler is in charge of giving assignments to worker nodes. Scheduler constantly keeps track of whether a new assignment has been created. It will take over the assignment, check which nodes are available and have a possibility to complete that assignment. Whether a certain assignment will be completed or not depends on the resources of a specific machine, that is on whether there is enough memory, how much the processor is occupied, the amount of containers which have been already run, etc. After that, if there are more nodes which can perform the assignment, it will sort them out and take the one that it considers to be the best one for completing this assignment.
Dispatcher is a component to which all the worker nodes connect and respond to. Each worker will report how many resources it has, how many containers are run and other things when they want to connect to the dispatcher. Also, a constant communication takes place between the worker and dispatcher on the manager node, a so-called heartbeat, so that the manager would know if the worker node is still “alive” or if it has turned off. Its main role is to forward the assignments to worker nodes. It will check if there is a new assignment which is created and which worker should complete it. If a new assignment exists, it will forward it to a specific worker.
Swarm in a local network
To enable swarm mode we should call init method with a command:
docker swarm init
After calling, the docker will do the following things for you:
- It will activate swarm mode for a current node
- It will create Swarm and name it default
- It will proclaim the current node as the manager
- It will name node by the machine’s hostname
- It will configure the manager to listen on the port 2377
- It will change the state of the manager into the state active, which means that it can be given new assignments
- It will run Raft database
- It will make self-signed root CA for swarm which will be used to issue certificates for new nodes.
- It will generate a token which will be used to connect new nodes to Swarm
- It will create a new network named ingress by using overlay driver
- It will create IP addresses for a new network
Swarm is initialised and a current node is proclaimed as a manager. Also, the commands which the user could use in order to join a new node to the Swarm are displayed, either as a worker or as a manager. After creating Swarm we can call a command which will show us all the nodes in it:
docker node ls
To get more detailed information about a current node where we are located, we will call:
docker node inspect self
This command will show a lot of information about the node, so that we can forward the option --pretty. This will make the form of the printout more easily readable.
This was the part of Docker Series where we introduced you with the Docker Swarm. In the next blogs, I am writing about Swarm’s services and multi-node Swarm, but with more specifics.